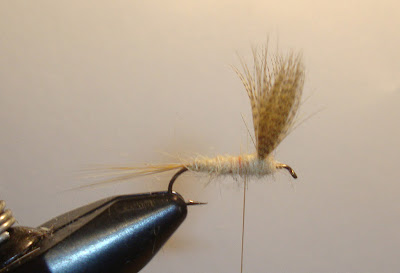
There are a lot of newbies getting into fly tying. I figured I'd give a tute how to tie a basic catskill tied dry fly. Tail, dubbed body, wings and hackle. Nothing fancy. This is an in depth look at each step.
This is my way of tying and I'm sure there are others that change the steps or tie them differently. Eventually everyone finds their easy way of tying.
Hope this helps.
I'm using a basic March Brown pattern. I use a standard, 1x or 2x long dry fly hook depending where I'm fishing and the size of the March Browns in the area.
I didn't strive for perfection, (doing a tute is hard enough), but I wanted to get you familiar with the steps.
Thread; orange
Tail; ginger hackle barbs
Wing; heavy barred wood duck flank upright and divided
Body; light red fox fur and seal fur mixed. Or match-the-hatch March Brown dubbing
Hackle; 1 ginger hackle and 1 grizzly hackle from a rooster cape
Wing= hook length
Tail= wing length
Hackle= shank length
I start the thread about a 1/4 way back from the hook eye and wrap forward to behind the hook eye. I then wrap over the previous wraps towards the back of the hook stopping at the end of the hook shank. If you let the thread dangle it should be about even with the hook barb on most hooks.
Measuring tail
Tying in the tail
Start at the end of the shaft and wrap forward
measuring the wing
Bring the thread about a 1/3 way behind the hook eye and tie in the wing with the tips over the hook eye.
Wind a few wraps behind the wing, lift up the wing, and a few wraps in front to stand the wings up. They don't have to be perfectly upright at this step if you tie the fly like I do.
Remember this fly should float so the fewer wraps the less weight! Make sure they are tight
Trim the wing butts at an angle to the hook shaft about where the end of the tail was cut. In this way when you wind the thread back to the tail it will taper nicely.
Seperate the wings and tie in figure 8's between the split wings and under the hook
Wind the thread back to the tail in tight wraps
You're ready to dub the body. Specific, already mixed dubbing is fine and easy but doesn't always match the exact color of the fly on all streams.
1. If the dubbing feels too slippery use dubbing wax on your finger tips and/or thread. Get the tacky or sticky wax.
2. Twist the fur on the thread in only one direction.
3. You DON'T have to get the precise amount to cover the body on the thread when you start. You can add as you go.
For fat bodied flies, be it dries, nymphs or others, do not put a big gob of dubbing on the thread all at once. Keep with a generious amount that holds to the thread nicely. If after the first wraps, the body needs to be bulkier, add another wrap of more dubbing.
Dub the body forward towards the wings with even close wraps.
Dub a couple of wraps in front of the wings to stand the wings up straight. I havn't found any disadvantages of tying in the dubbing this way. My flies still float correctly and my wings stay upright like I want themAfter dubbing return the thread behind the wing as shown.
For this fly I'll use one grizzly hackle feather and one ginger hackle feather.
Gauge them to size is easier using a hackle gauge.
When you trim the base don't trim it right to the stem. Leave some cut fibers extending out to catch the thread keeping the hackle from slipping out.
Lay the first hackle feather on the dubbing, sideways as shown, with the butt between and extending through the split wings. (This will also keep your wings seperated should they get wet)
Tie in the 2nd hackle over the first hackle.
Wind your thread to the front of the wings and tie down the hackle butts. (trim off the butts that hang over the eye)
Keep the thread back from the eye
Grab the top hackle with your hackle pliers and wrap forward. usualy 3-4 wraps behind the wing and two in front if you left enough space.
tie in and trim the hackle before proceeding to the next hackle
Wrap the bottom hackle right through the first wrapped hackle the same amount of wraps. Tie off behind the eye
After wrapping a tapered head behind the eye I use a hollow tool, as shown, to fit a few tight wraps of thread up against the hackle.
Finish tying down and I always dab the head with head cement.
If the wings look too long then go ahead and trim them. I personally try to make the wings correct without trimming them. I don't know if the fish mind one way or the other
I hope this helps those who are getting into tying dry flies. There is no greater feeling, in fly fishing, than to see a fish rise to your hand tied dry fly!!
~doubletaper


I totally agree, catching fish on your own flies takes the sport to a whole new level.
ReplyDeleteNice pattern! I tie something very similar.
ReplyDeleteThe March Brown is one of my favorite dry fly patterns. Easy to see and hatches sporadically throughout the day.
ReplyDeleteThis is cool!
ReplyDeleteyour blog Provides things are helps me to find my detail. your blog is very good for me
ReplyDeleteplease keep it up.I like it
Visit :- Hand-Tied Dry Flies